This document includes
Android Wear 2.0 updates the visual style and interaction paradigm of notifications as well as introduces expanded notifications, which provide substantial additional content and actions in an app-like experience.
The visual and interaction changes make it much easier for users to read and interact with notifications from your app. Expanded notifications enable you to deliver Wear users an app-like experience even if you haven't built an Android Wear app.
Note: When developing for Wear 2.0, ensure that you have the latest version of the Android Wear app on your phone.
Visual Updates
Notifications receive important visual updates in Wear 2.0, with material design visual changes.

Figure 1. Comparison of the same notification in Android Wear 1.x and 2.0.
Some of the visual updates include:
- Updated touch targets of a notification:
If no
contentIntentis set or if the notification is bridged from a paired phone, then tapping the notification opens an expanded notification. If the notification is generated locally by a Wear app and if acontentIntentis set, tapping the notification fires thecontentIntent. - Dark background color:
If you have notifications that are bridged to wearables, you need to be careful
with regards to using color for the notifications. Since a bridged
notification needs to support both light (Wear 1.x) and dark (Wear 2.0)
backgrounds, it is unlikely that any colors will work well on both.
DisplayIntentnotifications render with both light and dark backgrounds as well, and need to be checked for the same reason. We recommended that you don't set color for bridged notifications. When Wear apps post local notifications, you can work around this by checking the API level of the device they're running on and using an appropriate color for Wear 1.x and a different color for Wear 2.0. - Updated horizontal swipe gesture on a notification: To dismiss a notification in Wear 2.0, the user swipes horizontally in either direction. So if your notification instructs the user to swipe left or right, you must update the text of your notification.
Expanded Notifications
Android Wear 2.0 introduces expanded notifications, which provide substantial additional content and actions for each notification.
When you specify additional content pages and actions for a notification, those are available to the user within the expanded notification. Each expanded notification follows Material Design for Android Wear, so the user gets an app-like experience.
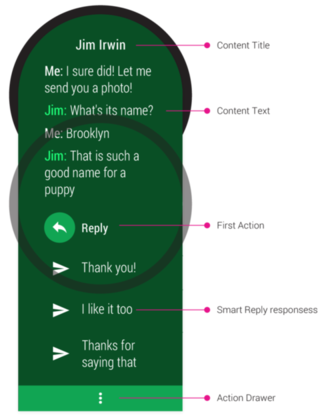
Expanded notifications
If the first action in the expanded notification has a
RemoteInput
(e.g., a Reply action), then the choices you set with setChoices()
appear within the expanded notification below the first action.
The user can view the expanded notification by tapping on a notification when either of the following is true:
- The notification is generated by an app on the paired phone and bridged to Wear.
- The notification does not have a
contentIntent.
Best practices for expanded notifications
To decide when to use expanded notifications, follow these guidelines:
- All notifications bridged from the paired phone to the Wear device will use expanded notifications.
- If a notification is generated by an app running locally on Wear 2.0,
you should
make the touch target of your notification launch
an Activity
within your app by calling
setContentIntent(). We recommend that you do not use expanded notifications for notifications generated by an app running locally on Wear 2.0.
Adding expanded notifications
Expanded Notifications allow you to include additional content and actions for a notification. You choose the level of detail that your app's notifications will provide; however be judicious with the amount of detail you include in a notification.

Adding additional content
To show additional content in your expanded notification, see Adding Pages to a Notification.Additional content pages are stacked vertically in the expanded notification
and appear in the order they were added.
These additional content pages can optionally use a style such as BigTextStyle or BigPictureStyle.
Primary action
The expanded notification will contain one primary action, which is the first action in the notification unless a different action is specified usingsetContentAction().
Additional actions
To specify additional actions, use
addAction()
or addActions().
The action drawer of the expanded notification contains all available actions.
MessagingStyle
If you have a chat messaging app, your notifications should use
Notification.MessagingStyle,
which is new in Android N. Wear 2.0 uses the chat messages included
in a MessagingStyle notification
(see addMessage()) to provide
a rich chat app-like experience in the expanded notification.
Note: MessagingStyle
expanded notifications require that you have at least version 1.5.0.2861804 of the
Android Wear app
on your paired Android phone. That version will be available within the next
few weeks in the Play Store.
Smart Reply

Wear 2.0 also introduces Smart Reply
for MessagingStyle notifications.
Smart Reply provides the user with contextually relevant, touchable choices in
the expanded notification and in RemoteInput. These augment the fixed
list of choices that the developer provides in
RemoteInput
using the
setChoices() method.
By enabling Smart Reply for your MessagingStyle notifications, you provide users with a fast (single tap), discreet (no speaking aloud), and reliable way to respond to chat messages.
Responses generated by Smart Reply are shown in addition to those set using the
setChoices() method.
To enable Smart Reply for your notification action, you need to do the following:
- Use
Notification.MessagingStyle. - Call the method
setAllowGeneratedReplies()for the notification action. For more information, see the downloadable API reference. - Ensure that the notification action has a
RemoteInput(where the responses will reside).
The following example shows how to create a MessagingStyle notification with Smart Reply responses.
// Create an intent for the reply action
Intent replyIntent = new Intent(this, ReplyActivity.class);
PendingIntent replyPendingIntent =
 PendingIntent.getActivity(this, 0, replyIntent,
  PendingIntent.FLAG_UPDATE_CURRENT);

// Create the reply action and add the remote input
NotificationCompat.Action action =
 new NotificationCompat.Action.Builder(R.drawable.ic_reply_icon,
  getString(R.string.label), replyPendingIntent)
 .addRemoteInput(remoteInput)

// 1) allow generated replies
.setAllowGeneratedReplies(true)
 .build();

Notification noti = new NotificationCompat.Builder()
 .setContentTitle(messages.length + " new messages with " + sender.toString())
 .setContentText(subject)
 .setSmallIcon(R.drawable.new_message)
 .setLargeIcon(aBitmap)
 // 2) set the style to MessagingStyle
 .setStyle(new NotificationCompat.MessagingStyle(resources.getString(R.string.reply_name))
 .addMessage(messages[0].getText(), messages[0].getTime(), messages[0].getSender())
 .addMessage(messages[1].getText(), messages[1].getTime(), messages[1].getSender()))


// 3) add an action with RemoteInput
.extend(new WearableExtender().addAction(action)).build();